How To Set Up Jupyter Notebook for C++ in VS Code
Learn how to install C++ on Jupyter Notebook within VSCode in a WSL2 environment.
In this tutorial, I will guide you through the process of starting your C++ journey on Jupyter Notebook.
The whole process is summarized below:
flowchart TD
    mf(Mambaforge)
    mb(Mamba package installer)
    xc(Xeus-cling interpreter)
    br([Browser])
    vs([VS Code])
    jp(Jupyter lab)
    mf-. uses .-> mb
    mb-. installs .-> xc
    mb -. installs .->jp
    br -. runs .->jp
    vs -. runs .->jp
    jp-. uses .-> xc
Prerequisites
- WSL or Linux. (I will be using WSL 2 running Ubuntu)
- VS Code
- wget
Why mambaforge
Mambaforge is a cross-platform package manager. It uses the
mambapackage manager.
I decided to use the Mambaforge package installer rather than Miniconda or Anaconda for the following reasons:
- Anaconda installs too many packages by default.
- The package manager
mambais faster than thecondapackage manager in Miniconda. - I ran into a lot of issues with Miniconda:
- Unable to update conda (Github issue)
- Unable to install xeus-cling:
1
2
3
4
5
6
  ○ conda install xeus-cling jupyterlab -c conda-forge
Collecting package metadata (current_repodata.json): done
Solving environment: failed with initial frozen solve. Retrying with flexible solve.
Solving environment: failed with repodata from current_repodata.json, will retry with next repodata source.
Collecting package metadata (repodata.json): done
Solving environment: failed with initial frozen solve. Retrying with flexible solve.
If you have faced the same issues then this tutorial might help you.
Download Mambaforge installer
Go to the mambaforge repository and copy the download link for the latest Mambaforge installer for your OS.
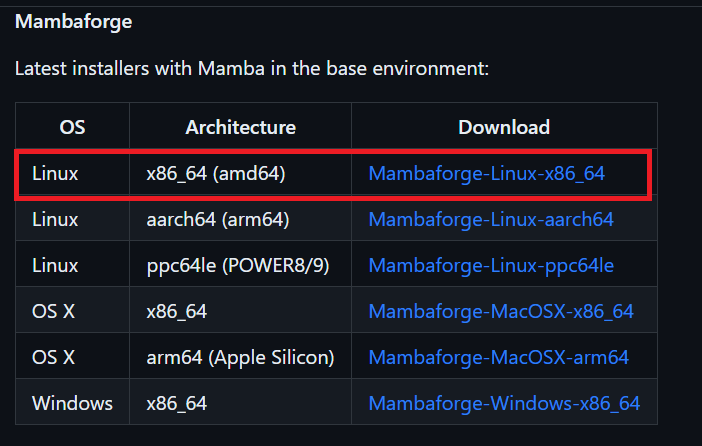 Since I am using WSL, I chose the copied the first download link.
On the mambaforge repository, be careful not to confuse between Mambaforge and Miniforge installers.
In the root directory of your terminal, run
1
wget https://github.com/conda-forge/miniforge/releases/latest/download/Mambaforge-pypy3-Linux-x86_64.sh
The download link I used may be outdated. Replace my link with the updated link from the github repository.
Install Mambaforge
Find the name of the downloaded file using ls. In my case, the name of the installer is Mambaforge-Linux-x86_64.sh. Now install Mambaforge:
1
sh ./Mambaforge-Linux-x86_64.sh
You will have to accept the license terms of Mambaforge. Press q to skip to the end of the license instead of pressing ENTER repeatedly.
1
2
3
4
5
6
7
8
9
10
11
Do you accept the license terms? [yes|no]
[no] >>> yes

Mambaforge will now be installed into this location:
/home/mcl/mambaforge

  - Press ENTER to confirm the location
  - Press CTRL-C to abort the installation
  - Or specify a different location below

[/home/mcl/mambaforge] >>>
Install at the location given by Mambaforge. You will also be asked to initialize Mambaforge. Accept everything.
Restart your terminal when everything is done. You should find a new folder Mambaforge in your root directory. You will also see that you are currently in the base environment.
Run mamba --version to verify that everything was installed:
1
2
mamba 1.4.1
conda 23.1.0
Your versions might be different but it is not an issue as long as you are using the latest versions.
If you want to get rid of Mambaforge permanently, follow these instructions.
Install xeus-cling
xeus-cling is a Jupyter kernel for C++ available on WSL 2 and Linux but not on Windows at the time being. The latest instructions on how to install xeus-cling can be found on their github repository.
Create an environment named cling and activate it:
1
2
mamba create -n cling
source activate cling
Then you can install its dependencies:
1
mamba install xeus-cling -c conda-forge
The file size of xeus-cling is around 400MB.
If you want to deactivate the environment, run
conda deactivate.
Install jupyterlab
Make sure that the
clingenvironment is activated before proceeding.
1
mamba install jupyterlab -c conda-forge
The file size of jupyterlab is around 90MB.
Run notebook in VS Code
Install the Jupyter extension pack and enable it in the Remote Extension Host. The pack should contain the following extensions:
- Jupyter by Microsoft
- Jupyter Keymap by Microsoft
- Jupyter Cell Tags by Microsoft
- Jupyter Notebook Renderers by Microsoft
To run a C++ notebook in VS Code there’s no need to activate the cling environment.
For testing, create a notebook a.ipynb on VS Code (or open an existing one).
Click on the Select Kernel option in the top right corner.
 Jupyter notebook in VS Code. Click on image to maximize
Choose Jupyter Kernel as kernel source in the dropdown menu that appears. Finally, select the C++ version that you want to use.
 Jupyter notebook in VS Code. Click on image to maximize
If you don’t see the kernels appearing in the dropdown, I recommend uninstalling the Jupyter extension pack, re-installing them, and restart VS Code.
You can write a quick hello world program and execute the cell using SHIFT + ENTER.
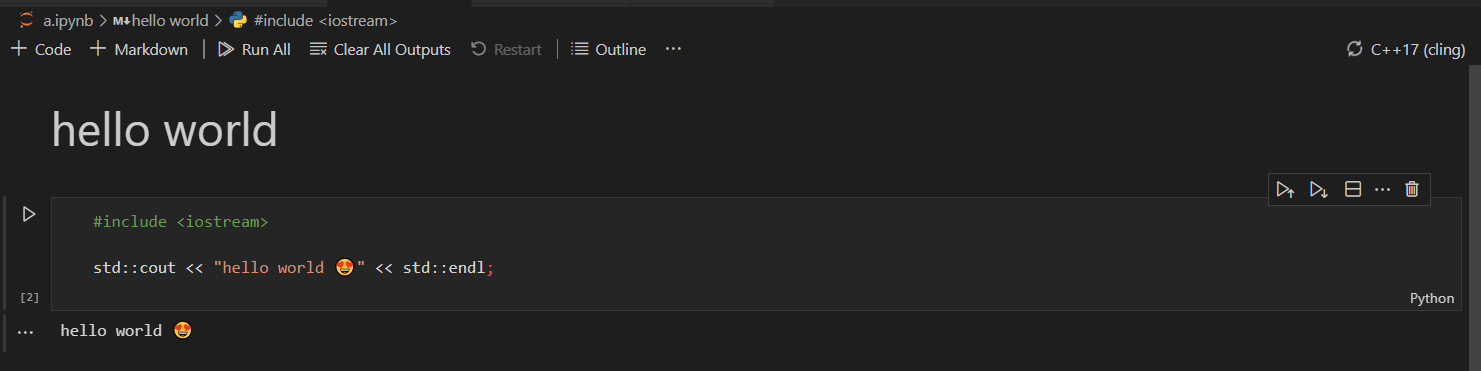
On the bottom right corner of the cell, you will notice that Python is written. This is because Python is the default cell language mode. You can change this if you want by clicking on Python and then selecting C++.
At the time being, formatting c++ code in jupyter notebooks in VS Code is not possible.
Run notebook in browser
If you want to run your C++ Jupyter notebook on your browser instead of VS Code, follow these instructions:
After activating the cling environment with source activate cling, run:
1
jupyter notebook --no-browser
A similar message will appear:
    To access the notebook, open this file in a browser:
        file:///home/mcl/.local/share/jupyter/runtime/nbserver-13926-open.html
    Or copy and paste one of these URLs:
        http://localhost:8888/?token=b3f2faa815cb120965bcec37b6a08bcec9a23f1b9550ee0f
     or http://127.0.0.1:8888/?token=b3f2faa815cb120965bcec37b6a08bcec9a23f1b9550ee0f
Open one of these URLs in your browser. I am using a Chrome browser installed on Windows.
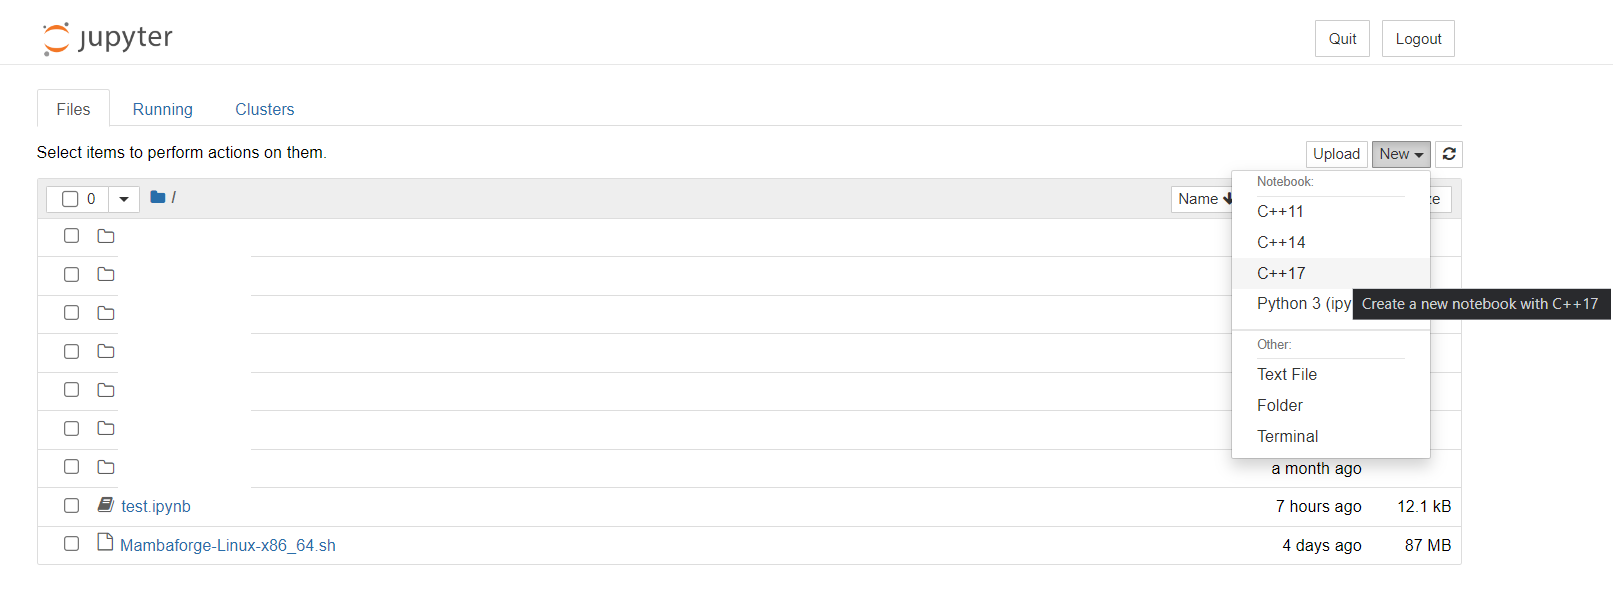 Jupyter notebook in Chrome browser